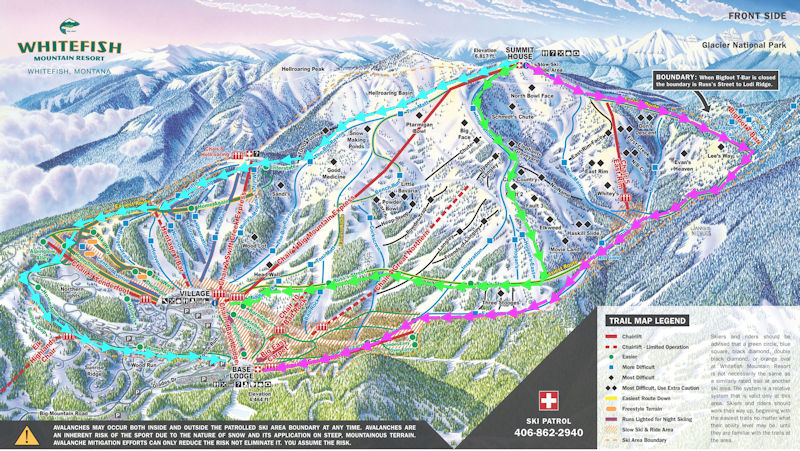
|
(There is no tour of the center area because it is substantially viewable on your way up Chair One. The areas you see on the way up can be accessed by following Toni Matt for the most part.)
|
 Around the World (adapted) -- A Tour of the Ptarmigan Bowl, Chair Two, Chair Three, and Base Area Around the World (adapted) -- A Tour of the Ptarmigan Bowl, Chair Two, Chair Three, and Base Area
This series of trails is commonly referred to locally and not on the map. For purposes of this page, however, I am expanding it to make sure you see as much as possible, which means adding in Home Again to the normal sequence.
- Take Chair One to the summit. Turn hard right as you exit the chair and head back towards the front of the resort, with the Summit House on your left. Take the fork which takes you to Toni Matt and Big Ravine.
- This brings you to the top of Ptarmigan Bowl. Toni Matt curves across the top of the bowl and down to Chair One. Below you the Bench Runs are visible, while off to your left shoulder is Big Face.
- Head down the slope, keeping to skier's right, and head towards Big Ravine, passing 1000 Turns on your right (not well marked). There is a flat section and then you will come to the top of the Big Ravine trail. Good Medicine is on skier's left. This is a treed area that has varying densities of trees and the opportunity to exit to an intermediate run at almost any point. School Road
is on skier's right. It is a short expanse of usually ungroomed snow, that may or may not have trees on it depending on the season. From School Run, you can gaze into Hellroaring Basin if you choose.
- Begin heading down Big Ravine, but look for an exit road on skier's right before Big Ravine turns off to the left. This is Interstate.
- Follow Interstate over to the Chair Two area.
- Pass under the lift, cutting across Upper Mully's, then across Ed's Run, and over to Hellroaring. Looking up hill. you will see the Jesus statue that is the cause of a lot of ruckus these days, but is sure to be in most skier's scrapbooks as one of their pictures.
- Head down Hellroaring, passing Hibernation on skier's left and glimpsing Swift Creek on skier's right. You'll come to a junction with Nice Day heading off just to the left of the race shack and T-Bar, Heaven hiding behind the race shack, and a trail heading roughly straight ahead of you called Home Again. Swift Creek
is the trail coming in from the right.
- Follow the sign to Home Again, which brings you to yet another intersection, this time with Ranger Trail. You are going to take the turn off to the right, following Home Again over to the Chair Three area.
- Home Again meanders back and forth a bit, passing the old half pipe glimpsed through the trees on skier's left, and over to the top of one of the terrain parks. Keep following Home Again, under Chair Three, and past the sign about Lodging properties.
- Home Again now starts passing through the real estate developments, across a bridge and down to skier's left, passing under nice homes, to a bridge across Big Mountain Road. Just past that bridge, you can see parking on your left, then down through more homes to the Base Area and Chair Six.
- This is the end of the first tour.
|
 Russ's Street to Expressway -- A Tour of the North Bowl, Eastern Face area, and Learning Zone Russ's Street to Expressway -- A Tour of the North Bowl, Eastern Face area, and Learning Zone
This route takes you along the eastern edge of the resort, taking you below the treed areas of North Bowl and the eastern part of the mountain.
- Take Chair One to the summit. Head to the right as you get off the Chair, to the signs for Russ's Street and Moe-Mentum. (The initial pitch down the Ant Hill CAN be a bit much for some lower level skiers and if so there are small signs showing a way to avoid some of the pitch by heading past the Summit House towards the front of the resort and taking a HARD LEFT back across the slope under the
Summit House to return to a lower spot on the Ant Hill. It won't save you much. The Ant Hill is only a blue run, but there can be congestion and occasionally moguls build up during peak days.) The Ant Hill gives you a nice view of East Rim off to your right, with one of the longer mogul slopes, Marmot, off to your left.
- At the bottom of the Ant Hill, continue STRAIGHT and follow the signs for Russ's Street. Do not take the Goat Haunt turn as many visitors do. As you proceed along the Russ's Street flats (keep your speed), you will pass the entry to First Creek on your right, then the larger entrance to Moose on your right, the almost invisible entry to Evan's Heaven "Back Door",
and finally the entry to Lee's Way and Evan's Heaven, once again on your right. All these entries are not helpful in terms of eyeballing the terrain, however. You will get a better opportunity in just a bit as Russ's Street will curve to the right and then head back under all these slopes as it returns to Chair One.
- When you finally get past the flat section and resume heading down hill (by the Lee's Way sign), there is a junction where you can see the trail leading to the Bigfoot T-Bar (commonly called T-Bar 2 here) which you will primarily use to access the Backside area if you are an advanced skier or the frontside of this area if you are a lower level intermediate. DO NOT TAKE THIS EXIT for this tour. Instead, follow Russ's Street
around to the right.
- As you follow Russ's Street after the turn, you will be able to look up Lee's Way, then the rest of Evan's Heaven, then Moose on your right. Glimpses of East Rim Chutes and the Nose are somewhat visible as well.
- You will arrive at a major trail junction with the bottom of Moe-Mentum. Stop here. Looking up to your right, you will be able to see more of East Rim Chutes and also Whitey's as you look across Moe-Mentum. The entry to Over the Hill Gang is ahead of you and above that is Haskill Slide. Kings and Aces is the line to the right side of the Haskill Slide pitch. It can
be accessed from the No Name trail which is not visible from this point. Haskill Slide proper is accessed from Inspiration.
- Proceeding down Russ's Street, you'll pass the lower end of Over the Hill Gang and get a glimpse on your right of Movieland before coming to the junction with Expressway.
- At the Expressway exit, head left. You'll pass the Stooges on your right, then come to the junction with Inspiration.
- Head down Inspiration, which takes you along Chair Nine and the beginner's area with Under Easy and Over Easy off to skier's left. You'll pass the bottom of Corkscrew, then take one of the right side exits (I think there are three) that take you back to the Chair Six area. (Heading straight will have you ending up at the Ski Patrol clinic.)
- This is the end of this tour.
|
 Inspiration to Chair One -- A Tour of the North Bowl area, Ptarmigan, Front Side Cruisers and return to Main Lift (Chair One) Inspiration to Chair One -- A Tour of the North Bowl area, Ptarmigan, Front Side Cruisers and return to Main Lift (Chair One)
This route takes you down the high ridge that runs south from the summit and gives you a bird's eye view of North Bowl and Ptarmigan Bowl.
- Take Chair One to the summit. Turn hard right as you exit the chair and follow the signs to Inspiration. "Inspo" is one of the more well known runs on the mountain because of its extensive views of the valley, including Whitefish Lake. It basically runs along the ridgeline between Ptarmigan and North Bowls, giving you a great view of the off piste offerings in those bowls
without being committed to skiing them until you get the urge.
- As you follow the cat track over to Inspo, you'll be passing North Bowl Face (right below the Summit House) on skier's left, followed by Schmidt's Chute (above even with the top station of Chair 5), and then Space (starting just after Schmidt's and right around the end of the cat track.)
- As you come off the cat track, you'll be running along Inspiration's ridge line, with Big Face on skier's right and the beginnings of Elephant's Graveyard on skier's left. Pull over here to the right side of the trail for a bit.
- Below you, you'll see Ptarmigan Bowl, embraced by the curve of Toni Matt, in the distance. There is also a trail peeling down from Toni Matt to end at the bottom of Ptarmigan Bowl and that is the Bench Run. Taking Bench Run will give you access to Heep Steep and Little Bavaria, just visible if you've stopped in the right place and you know what to look for.
- Carefully head to the other side of Inspiration (skier's left) and take a look here. Below you is either Space or Elephant's Graveyard, depending on where you pulled off. The groomed run further down is Moe-Mentum, and beyond that is East Rim Face. The East Rim (opposite ridgeline) terminates with The Nose, some cliffs, then Whitey's.
- Continue down Inspiration's ridge. The extent of the trees on skier's left is still Elephant's Graveyard until the trail turns. On skier's right, you'll pass The Chute, a cleared and occasionally groomed section of Big Face, followed by a tiny trail called Bob's Run in those trees on the right, then Upper Langley.
- As you come to Inspiration's curve, ski over to skier's left, where you can look down No Name without actually committing to it. From there, arc back onto Inspiration.
- Heading down this pitch of Inspiration, you'll pass Cal's Country on skier's left, then Fault 2. From Cal's, you can get over later to the top of Haskill Slide (double black -- not visible from here and we're not headed there now). From Fault 2, the skier who knows what they are about can reach Fault 3, Movieland and Elkweed,
but we are not doing that now and they are not visible from this trail. (See the tour above to get a look at them.)
- Keep heading down Inspiration, note the little trail at the bottom of Fault 2. That trail will take you over to the top of Hogan's East, but we're not taking it yet.
- Before the trail starts turning to the left, you will see a Friends of Langley sign. Heading over that hump will take you to a treed area and bearing to skier's right a bit more will take you to Langley proper. We are not doing that now, however. Pull off to skier's right on the trail JUST PAST that grove of trees for Friends of Langley and look over the edge. Below you can see the continuation of
Inspiration (we're not going that way.)
- Turning back to the trail, look across and see how you can STAY HIGH and follow a trail above some trees to get over to Hogan's East (good time to look at a map...) Try and get over to Hogan's East from this point. (IF YOU CAN'T, no worries. There is another opportunity. As you cross the wide junction area, looking down just past the grove of trees in the middle of the trail junction, there is a road heading off to skier's right ACROSS THE HILL and DOWN from the grove.
Take that and if you miss it, well, you are on Hogan's (not East)). Because just about every entrance to Hogan's East is "invisible" it doesn't get a lot of traffic except from the locals. It's a nice groomed cruising trail, although not very long. Hogan's East, Hogan's, and this next section of Inspiration all come to Russ's Street, so not a big deal if you miss a turn here.
- Once on Hogan's East, on skier's left there is the lower part of Elkweed, a treed area of mostly moderate pitch. Continue on Hogan's East until the cat track crosses it, then head RIGHT onto Russ's Street.
- Russ's Street will take you below Hogan's Trees, then across Inspiration, below Langley, across Corkscrew (noticeable intersection). (Remember to look uphill at each trail junction and give way to skiers coming down the hill.)
- After crossing Corkscrew, you'll come to Bad Rock, then Middle Fork. You can take Middle Fork to Chair One, or continue just a bit further and take Many Falls to Chair One or, if you like, over to Chair Two.
- This is the end of this tour.
|
|

|
Hell Fire to Chair Two -- A tour of Hellroaring Basin
This is really just a run down Hell Fire trail with comments about what you are passing, and then the chair ride back up. There are no other Intermediate routes into Hellroaring Basin, but you can see what is available and enjoy a great cruiser while you are at it.
NOTE: Hellfire is almost always groomed. Sometimes when it is NOT groomed, it's okay. Other times, there may be signs around NOTIFYING YOU that it is not groomed. IF YOU SEE SIGNS ABOUT IT, it will NOT be a pleasure to ski and in fact, less than advanced skiers may be at risk. The trail is 3.3 miles long and much of it gets sun in the spring, which, when combined with the shadows from trees, can produce bands of sticky snow and ice across the trail. Skiing that
requires excellent balance. Add to that the fact that where all the trails converge for this basin there are trees in the middle of the trail and you have a recipe for a trip on a sled. If any in your party are "marginal" skiers, I'd avoid skiing this trail when the signs are WARNING that it is not groomed. When it is groomed, lower level skiers can find most of it enjoyable. (Read the page devoted to this trail for more info.)
- Take Chair One to the summit and as you come off the lift, head in the direction of the ski patrol shack.
- On your left is the trail that takes you to some of the backside runs and Hell Fire.
- Follow this run, picking up some speed, and head for the opening in the gates that occurs right before you would have to go UPHILL if you didn't take it. As you do this, you will be passing part of Connie's Coulee, alongside the less steep pitch.
- As you come to the cat track above the Basin, you will pass the entrance to Glory Hole, skier's left, which is just the cleared part of this slope running along Hell Fire. Sometimes Glory Hole's entrance is groomed and advanced skiers should be able to handle that when it happens, but for now, just continue along the cat track.
- The next section, with the trees, is called Sling Shot, and it continues for quite a ways. On skier's right, you'll see Radio Tower, which would have required you to go up the hill mentioned in step 3 and boot pack your way to the top. The pitches from up there that head this direction are fairly mild, with good spacing through the trees. Should you head towards the back, the pitch is steeper.
- Continuing along the cat track, the next area is Picture Chutes, a double black area with cliffs, the pitch of which is quite obscured by the trees, but IS viewable from School Road (mentioned in the first tour, step 3). Next you'll see, skier's right this time, a road leading off from the cat track. That road can take you over to Hellroaring Peak, which you will be seeing shortly.
- Just past that road, now on skier's left, is Gray's Golf Course. This is rated black, but advanced skiers should be able to handle if if they just follow the ridgeline until the trees start tightening up, then they can do an "easy out" by traversing across the steeper part of Gray's and then under Picture Chutes. For now, just stay on Hell Fire, but it's something to come back to later if you like.
- Continuing on Hell Fire, the densely treed area on skier's left is Back Nine. The area is quite large, densely treed, and fairly steep. It is also not very popular, so can have nice powder that no one has touched for weeks.
- Hell Fire will finally (!) get some pitch as it comes to the first bend. Pretty much the entire skier's left after the bend is still the Back Nine, with Hellroaring Peak on skier's right. Hellroaring Peak requires AT gear or bootpacking to get to the summit, but has nice wide trees and is pretty popular with hardier skiers.
- Continuing down Hell Fire, which undulates and then comes to another cat track, you will pass under the bottom section of Gray's Golf Course, quite densely treed in this area.
- Coming to Grand Junction you will see another trail joining up with Hell Fire. That is the runout of Glory Hole and the traffic from Connie's Coulee, Picture Chutes, Sling Shot, and Teepee will all be coming down to this point and continuing along Hell Fire to the lift UNLESS they took the Highway to Heaven traverse, which you will see a section of from the lift. The lift is slow and probably 50% of the people do take that traverse.
- Continue down Hell Fire to the lift and ride it up.
- Below you is Purgatory and roughly two thirds of the way up you will cross over Highway to Heaven, mentioned above.
- The top marks the end of this tour. You are close to the top of Chair Two and can take either groomed run to get over to that area. There is no way to just lap Hellroaring Basin as an intermediate without two lift rides. That should change when they move Chair 8, but that move is in the future sometime.
|
|
Gray Wolf is the first tour and the second is Goat Haunt to the Flower Point Lift to Inside Road to North Fork. They will need to be done IN ORDER to avoid too much skating. There is no way to EASILY get from Gray Wolf over to Chair 11 as you have to get by the liftlines and then it's slightly uphill. (Of course, I COULD send you via the T-Bar, but I know that many out there
just hate those things.)
|
Gray Wolf
This is just a run down Gray Wolf with comments about what you are passing, and then the chair ride back up. This is a great intermediate cruiser once again, and lets you peek at the black runs as you go by.
- From the summit, head TOWARDS the peak with the radio towers on it, passing Ski Patrol on skier's right.
- The trees immediately by ski patrol are part of the trees alongside Hollywood, followed promptly by Black Bear.
- The next treed area on skier's right is Black Bear Trees.
- The run curves around a cliff wall and you need to be careful here, as on bad visibility days you could find yourself on the double black run on skier's right called Big Horn.
- Carefully stop just past Big Horn (it's just a tad wider here so that skiers can get by you) on the extreme right of the trail and take a look at Big Horn itself and the treed area immediately in front of you called various names by different groups: Super Mario, Grey Horn, etc.
- Moving along Gray Wolf, the trail curves to your right. The pitch does a swoop down and up. Just as you come to the top of the "up", there is a break in the rope on skier's left usually where people are headed into the out of bounds area called, variously, Playground, or Mario World.
- As you continue along Gray Wolf, the area off to your right is also skied, but I don't know what people call it!
- Gray Wolf dips, then there is a curve to skier's right. Stop at the top of this pitch.
- Ahead of you is the junction of Big Horn, the Caribou Connector, and Gray Wolf. Traffic COULD be coming from your right at that junction, so be on the lookout for it.
- AT the junction turn LEFT, staying on Gray Wolf, following the ski area boundary. You need to keep your speed on this section, but it will take you by the "exit" road from Playground, so if you are interested in going there you should make a note of it. (You should NOT pass OVER that road to the far side if you want to get home.)
- Continue following Gray Wolf for a while until you come to the junction with other trails headed to the lift in front of you. You'll see the bottom pitch of Caribou, and the final section of Whitetail.
- Continue along the final pitch of Gray Wolf until you return to the lift.
- While sitting on the lift, you will first be passing over George's Gorge, surrounded by the shorter trees of the "Tree Farms".
- Looking over to your left, you'll easily see the exit of Whiskey Spring, cut through the trees on the hillside. The trail running along your left as you pass over the Tree Farms is Goat Haunt. The road intersecting Goat Haunt and continuing off to your left BELOW Whiskey Spring is the road you'll be looking for later on the pink route shown on the map. Also on your left is Whitetail,
intersecting Goat Haunt close to Whiskey Spring.
- Over on your right, the short steep run is Kodiak, usually moguled. The trees to the rider's right of that are PMS. As you can see the area's pitch is noticeably steeper the closer you are to Kodiak.
- As the chair starts to ascend more steeply, you are over Hollywood, with Silvertip immediately on your left.
- Soon, you are crossing OVER Caribou, with Hollywood still following the lift line upwards. The mogul runs to either side are Black Bear on your right and Marmot on your left. To the right of Black Bear, you'll once again see Black Bear Trees, and if you are there on a clear day, beyond that once again you'll see Big
Horn.
|
Flower Point area
- Be aware, sections of this route have been reclassified from blue to BLACK. The black area really doesn't apply to most of it, just really the final section of North Fork. I would strongly suggest that skiers level 6 and below just take a trip down Ridge Road and meet their friends back at the lift unless conditions are perfect.
- From the summit, head down the Ant Hill and follow the signs to Goat Haunt.
- Be aware that Goat Haunt MAY have a skiercross course set up on it, in which case if the trail along side it is too narrow for your tastes, you can use Whitetail to get to the road to the Flower Point lift, Chair 11. However, be advised that this tour is slightly more difficult than the other tours in that the final pitch can be above the abilities of certain skiers. If the trail alongside the skiercross gives you pause, you may not want to take
this tour.
- Follow Goat Haunt down, being conscious of the trees on skier's right. When they come to an end and you see the junction with Whitetail, you are going to be looking to skier's right for the road over to Chair 11. It is marked with a sign, but it's a small sign and easy to miss if you are not prepared. (Fearnot, however, there is a second opportunity added this year. You will miss crossing Whisky Springs, but still meet up with the tail end of Big Creek.)
- Take the road across the front of Whiskey Springs until it crosses Big Creek.
- Take Big Creek down to the chairlift.
- As you go up the lift, you will see the flat exit of Ridge Run to your left, and coming down the slope the EXIT section of North Fork. Follow that run uphill as far as you can see it and decide whether you are ready for that section or not! (If you are not, then the EASIEST way down is via One Grand Parade, but an alternative route that still allows you a view into Canyon Creek would be Ridge Run.)
- The lift line run below you is the only black diamond run in this area (aside from the trees), called Hidden Meadow. I've never seen it groomed, so it is almost always a mogul run.
- You will cross over North Fork about half way up the ride.
- At the top, head to your right towards the Summit House which you can see in the distance, to Inside Road. (If you have had second thought as mentioned above, follow the signs to the other runs.)
- At the bottom of the first section of Inside Road, turn right onto North Fork.
- Follow North Fork, crossing Hidden Meadow and then the intersection with Outside Road.
- After the intersection with Outside Road, you may want to pause at the spot in the trail where it turns noticeably to skier's left. This section can be in bad shape, and take some scoping out for rocks and roots and fallen skiers. You may also want to pause again as the run crosses the road midway down as there is another tricky section just below the lip of the road. Once again possible roots and rocks, and fallen skiers.
- North Fork will return you to Chair 11, but you can skate by it to Chair 7 if you like.
|